尚硅谷_React(3) - redux
相关代码:redux_test.7z
redux理解
专门用于做状态管理的JS库(不是react插件库),可用在react/angulat/vue项目中,基本与react配合使用。 作用:集中式管理react应用中多个组件共享的状态。 何时需要使用redux:
- 某个组件的状态,需要让其他组件可以随时拿到(共享)。
- 一个组件需要改变另一个组件的状态(通信)。
- 总体原则:能不用就不用, 如果不用比较吃力才考虑使用。
学习文档
- 英文文档: https://redux.js.org/
- 中文文档: http://www.redux.org.cn/
- Github: https://github.com/reactjs/redux
redux工作流程
客人(React Components)、服务员(Action Creators)、老板(Store)、后厨(Reducers)

React Components是react组件,把想做的事告知Action Creators。
action
是一个对象,两个属性type和data。dispatch是一个函数,帮忙执行action对象。Store是调度者、指挥者(如餐厅的老板角色,我们去吃饭不能越过老板直接和后厨说吃啥,得和老板说),Reducer是最卖力的工作者,实际的打工人。最后弄完的状态存放在Store,组件通过getState()获取。
Action
- 动作的对象,包含两个属性:
- type:标识属性, 值为字符串, 唯一,必要属性
- data:数据属性, 值类型任意, 可选属性
- 例子:{ type: ‘ADD_STUDENT’,data:{name: ‘tom’,age:18} }
Reducer
- 能初始化状态(一次,第一次Store传给Reducers的previousState是undefined),也能加工状态。
- 加工时,根据旧的state和action, 产生新的state的纯函数。
求和案例-纯react版
redux-精简版
步骤:
- 安装:npm i redux
- 新建redux文件夹,新建redux.js和count_reducer.js
// 新建redux.js
/*
	该文件专门用于暴露一个store对象,整个应用只有一个store对象
*/

//引入createStore,专门用于创建redux中最为核心的store对象
import {createStore} from 'redux'
//引入为Count组件服务的reducer
import countReducer from './count_reducer'
//暴露store
export default createStore(countReducer)

// 新建count_reducer.js
*
	1.该文件是用于创建一个为Count组件服务的reducer,reducer的本质就是一个函数
	2.reducer函数会接到两个参数,分别为:之前的状态(preState),动作对象(action)
*/

const initState = 0 //初始化状态
export default function countReducer(preState=initState,action){
	// console.log(preState);
	//从action对象中获取:type、data
	const {type,data} = action
	//根据type决定如何加工数据
	switch (type) {
		case 'increment': //如果是加
			return preState + data
		case 'decrement': //若果是减
			return preState - data
		default:
			return preState
	}
}
- 在index.js中订阅状态更新,从而让react调用render重新渲染页面
- 在其它组件中使用store的相关api:
store.getState()获取值store.dispatch({type: 'increment', data: value*1})给reducer发指令- store.subscribe() 订阅redux状态的更改
redux完整版
引入了action和constant。
- 新建redux/count_action.js,存储相关的action,方便在组件中引入进行dispatch
- 修改组件中的相关代码
- 新建redux/constant.js,用于存储action中的type,以便整体的修改、不易出错
- 在redux中各个文件中进行引入
// count_action.js
import {INCREMENT,DECREMENT} from './constant'
export const createIncrementAction = data => ({type:INCREMENT,data}) // 命名太长,后面会改
export const createDecrementAction = data => ({type:DECREMENT,data})
// constant.js
export const INCREMENT = 'increment'
export const DECREMENT = 'decrement'
异步action
action不仅可以是上面的对象形式,还可以是函数形式。所谓的异步action就像网络请求等函数,结果需要等一会儿才能拿到。异步action不是必须要写的,也可以直接在组件中编写异步代码。
/** 异步action,指action的值为函数 */
export const createIncrementAsyncAction = (data, time) => {
  return (dispatch) => {
    setTimeout(() => {
      dispatch(createIncrementAction(data));
    }, time);
  };
};
异步action编写后不能直接使用,需要引入redux-thunk,即redux中间件。 安装:npm i redux-thunk,然后在redux/store.js中进行引入
import { createStore, applyMiddleware } from "redux";
import countReducer from "./count_reducer";
import thunk from "redux-thunk";

export default createStore(countReducer, applyMiddleware(thunk));
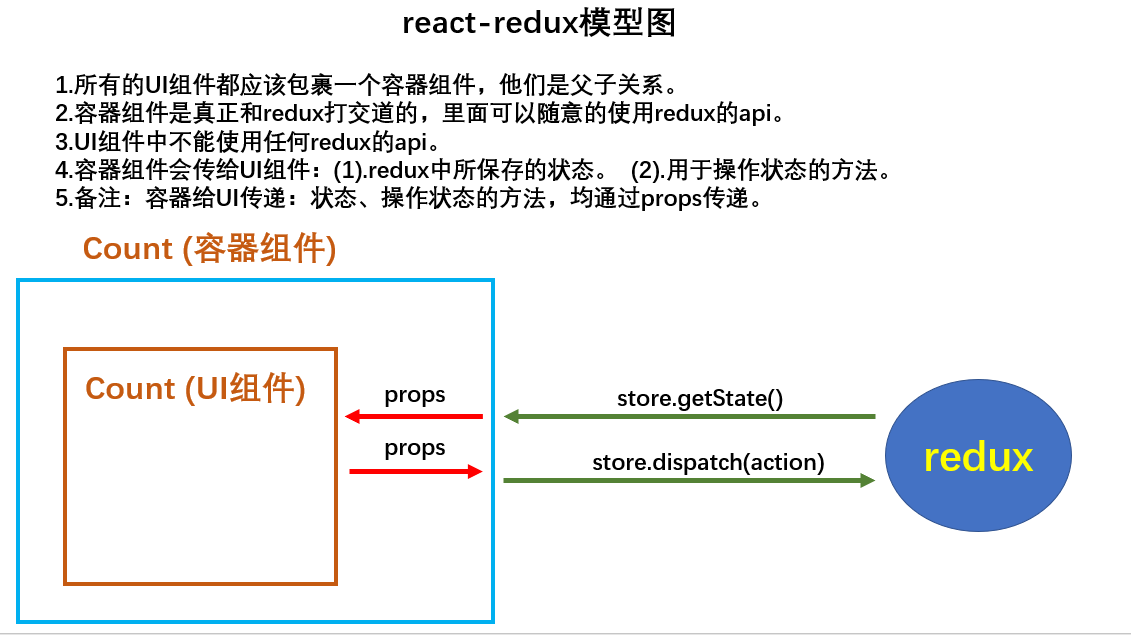
对react-redux的理解
redux和react-redux不是同一个团队出的,后者是facebook出的一个插件,原因是fackbook看到大家喜欢使用redux,就出了个插件react-redux。
react-redux模型图:

连接容器组件和UI组件
即对react-redux的具体实践,components文件夹写UI组件,container文件夹写容器组件。
- 安装:npm i react-redux
- 新建container文件夹写容器组件
- 删除原先components中对应组件与store有关的代码,重新以this.props.XXX的形式读取store中的状态以及操作状态的方法。
建议详看代码进行理解。
优化1:简化mapDispatchToProps
//mapDispatchToProps的简写
	{
		jia:createIncrementAction,
		jian:createDecrementAction,
		jiaAsync:createIncrementAsyncAction,
	}
优化2:Provider组件的使用
使用了react-redux后,就不用自己写监测了,react-redux会进行处理。 react-redux提供的Provider可以帮助传递store,优化了这样的情况:在有多个容器组件时就可以不用一个个传递store了。
优化3:整合UI组件与容器组件
当前有components文件夹和container文件夹,现在可以将容器组件和UI组件进行整合,整合成一个文件。 整理redux文件夹,创建actions、reducers文件
数据共享
定义另外一个Person组件,和Count组件通过redux共享数据; 为Person组件编写对应的Reducer、Action,并配置constant常量; 在store.js中引入combineReducers,对reducers进行合并;
const allReducer = combineReducers({
  he: countReducer,
  pers: personReducer,
}); // 这个就是store长得样子
现在store中就存着一个"对象"的形式了,不是之前单纯的一个count值的形式; 因此组件中使用也随之改变:
// count/index.js
export default connect((state) => ({ count: state.he, pers: state.pers }), {
  increment: createIncrementAction,
  decrement: createDecrementAction,
  asyncIncrement: createIncrementAsyncAction,
})(Count); // 这里的state就是一个总的对象
纯函数
在reducers/person.js中,很少使用push等方法,若这样写react不会检测到变化,页面不会更新
export default function personReducer(preState = initState, action) {
  const { type, data } = action;
  switch (type) {
    case ADD_PERSON:
      return [data, ...preState]; // 不要写成preState.unshift()的形式,react只进行浅比较
      // 而且,preState.unshift()改写了传入参数,使得reducer不为纯函数
    default:
      return preState;
  }
}
啥是纯函数,遵循一下约束:
- 同样输入需要得到同样输出;
- 不得改写参数数据、不产生任何副作用(如网络请求、输入输出设备)、不能调用Date.now()或Math.random()方法;
redux中的reducer函数要求必须是一个纯函数。
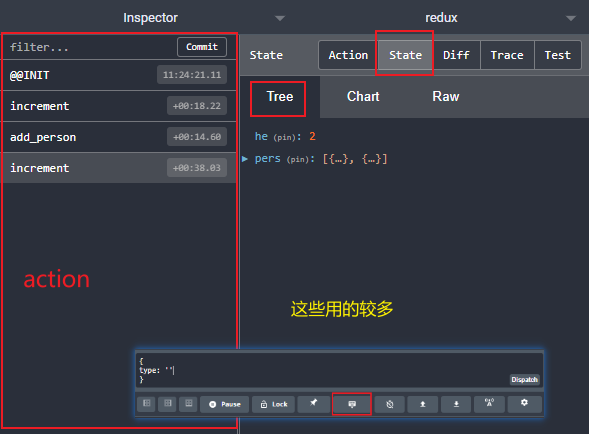
redux开发者工具
安装:chrome应用商店 - reduxDevTools,进行安装 如何让其工作:
- npm i redux-devtools-extension
- src/redux/store,引入
import { composeWithDevTools } from "redux-devtools-extension";
// ...
export default createStore(
  allReducer,
  composeWithDevTools(applyMiddleware(thunk))
);
- 打开浏览器,开发者工具,有redux一栏:

redux最终版
- 上面的命名不太好,逐个改改,所有变量名字要规范,尽量触发对象的简写形式。
export default connect(
	state => ({
		persons:state.persons,
		count:state.count
	}),//映射状态
	{addPerson}//映射操作状态的方法
)(Person)
- 方法名太长,改改
// action/person.js
export const addPerson = personObj => ({type:ADD_PERSON,data:personObj})
// action/count.js
export const increment = data => ({type:INCREMENT,data})
- store里不引入任何reducer,只引入汇总后的reducers,单独建一个文件reducers/index.js进行汇总:
/*
	该文件用于汇总所有的reducer为一个总的reducer
*/
//引入combineReducers,用于汇总多个reducer
import {combineReducers} from 'redux'
//引入为Count组件服务的reducer
import count from './count'
//引入为Person组件服务的reducer
import persons from './person'

//汇总所有的reducer变为一个总的reducer
export default combineReducers({
	count,
	persons
})
// 然后在store.js中进行引入
项目打包运行
打包后的文件,需要放到服务器上进行部署运行。 方法:
- 自己搭node/java后台
- 借助一个库serve,指定文件夹,快速开启服务器;
- npm i serve -g
- 终端:serve a,就会在文件夹a开启一个服务器;或已在当前目录,则serve